23 Creative Easter Crafts You Can Make with Dollar Store Supplies
Looking to brighten up your Easter celebrations without breaking the bank? Dive into these 23 fun and creative crafts you can whip up using supplies from your local dollar store. From festive decorations to clever gift ideas, these DIY projects are budget-friendly and perfect for adding a personal touch to your holiday festivities!
Spring Flower Wreath
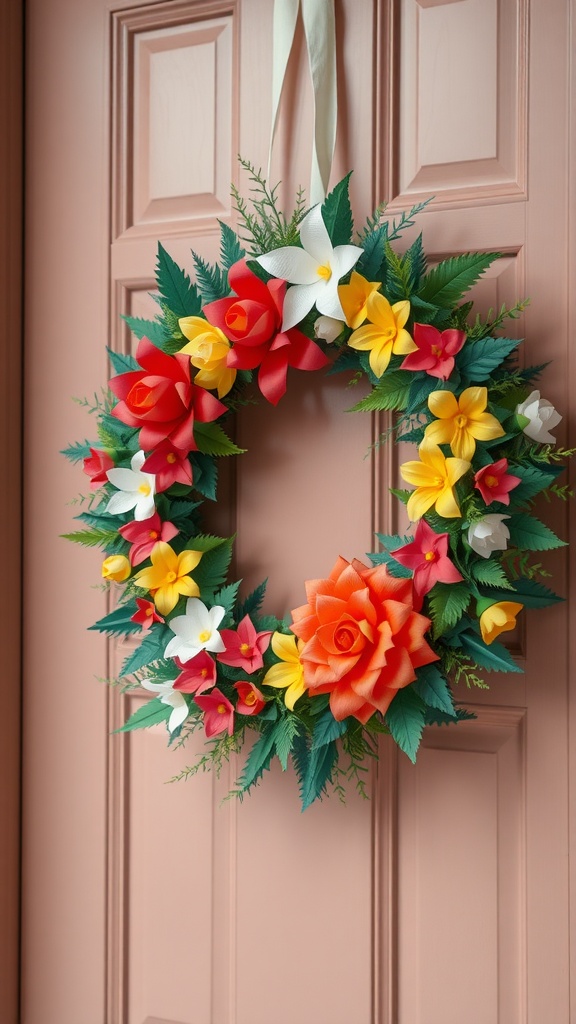
Spring is the perfect time to bring some color and cheer to your home. A Spring Flower Wreath is a fantastic way to do just that! This DIY project allows you to get creative and add a personal touch to your decor.
The wreath in the image features a vibrant mix of flowers, including red, yellow, and white blooms, surrounded by lush green leaves. This combination adds a fresh and inviting look to any door. You can easily find all the materials needed for this project at your local dollar store, making it both fun and budget-friendly.
To create your own, gather some faux flowers, a wreath base, and a hot glue gun. Start by arranging your flowers in a pattern you love, then securely glue them onto the wreath base. Don’t forget to add some greenery for that extra pop! Hang it on your door with a pretty ribbon, and you’ll have a lovely welcome for friends and family.
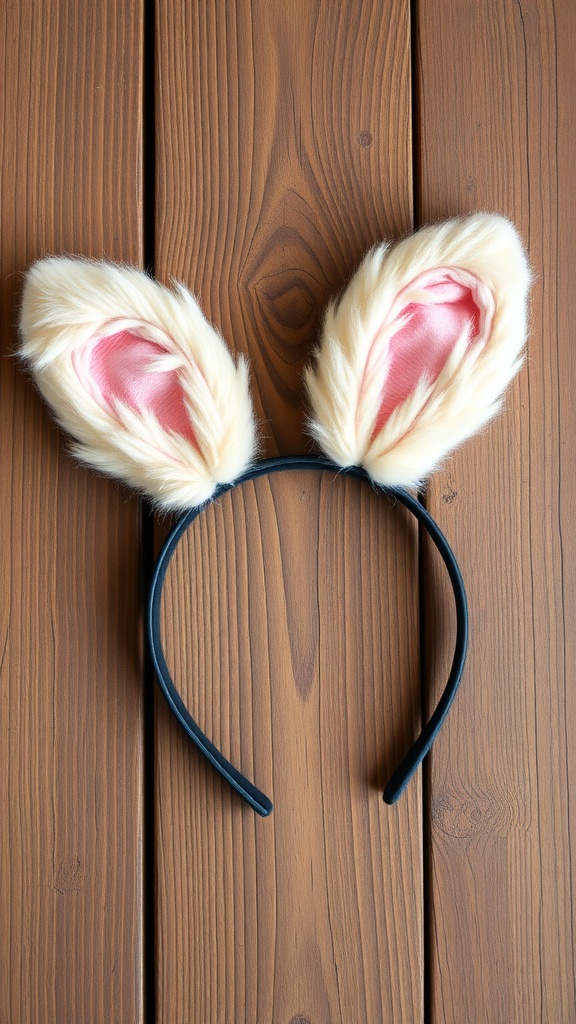
Bunny Ears Headband
DIY Painted Wooden Eggs
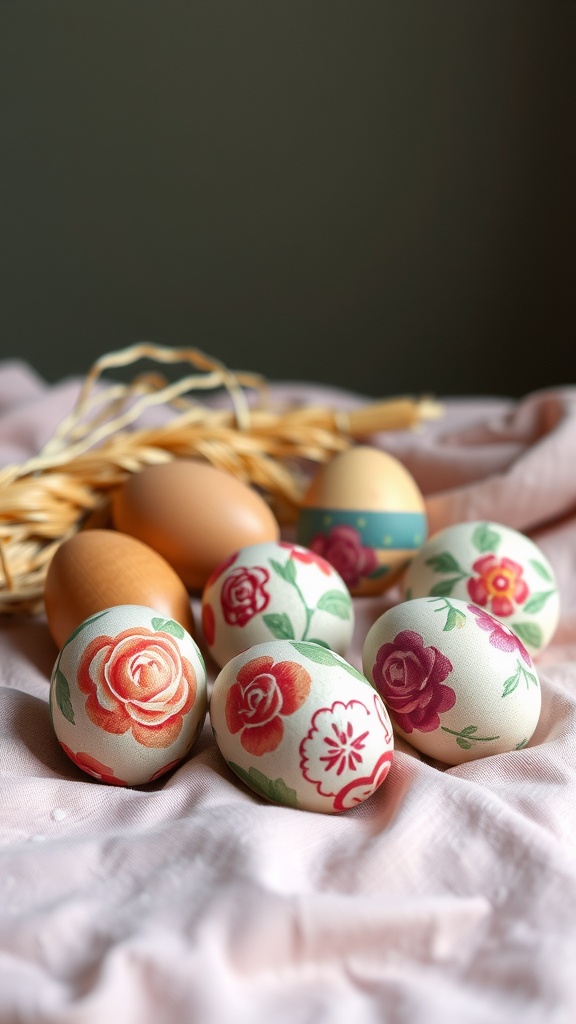
Painting wooden eggs is a delightful way to celebrate Easter. This craft is not just fun, but it’s also a wonderful activity to do with family and friends. In the image, you can see beautifully painted wooden eggs adorned with floral designs. They bring a touch of spring to your home decor.
To make your own painted wooden eggs, you’ll need some basic supplies. Grab a pack of wooden eggs from the dollar store, along with acrylic paints and paintbrushes. You can also pick up some stencils or stickers to help create your designs.
Start by painting the base color on each egg. Once that dries, use your brushes or stencils to add detailed patterns, like flowers or stripes. Feel free to get creative! When you’re done, these eggs make lovely centerpieces or festive decorations around the house.
Don’t forget to let your kids join in on the fun! They can create their own unique designs, adding personal touches to your Easter celebration. It’s a simple and enjoyable way to embrace the spirit of the holiday while making lasting memories.
Colorful Egg Garland
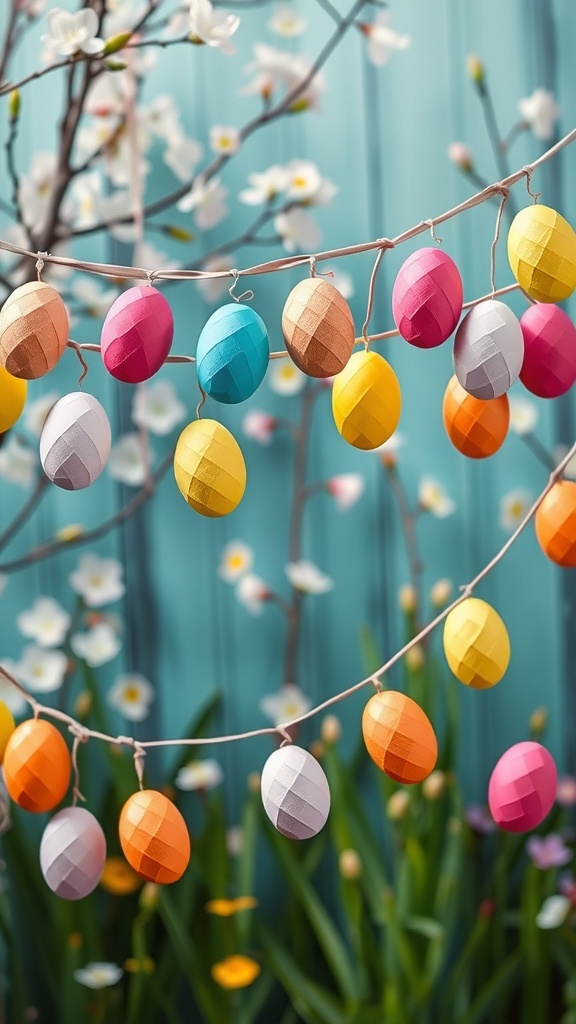
The colorful egg garland is a delightful way to add some festive flair to your Easter decorations. This playful craft features an assortment of vibrant eggs hanging gracefully, creating a cheerful atmosphere. Each egg showcases a variety of colors, like pink, blue, yellow, and orange, making it a true eye-catcher.
To make this garland, all you need are some foam or paper eggs, string or twine, and a little creativity. Simply thread the eggs onto the string, spacing them out as you like. You can also mix in some small flowers or greenery for an added touch. This craft is easy to customize, so feel free to use colors that match your home decor.
Hang your colorful egg garland above a doorway, across a mantel, or along a wall to brighten up the space. It’s not just a decoration; it’s a fun project that’s perfect for all ages. Gather your supplies from a local dollar store and let your creativity shine!
Easter Basket from Recycled Materials
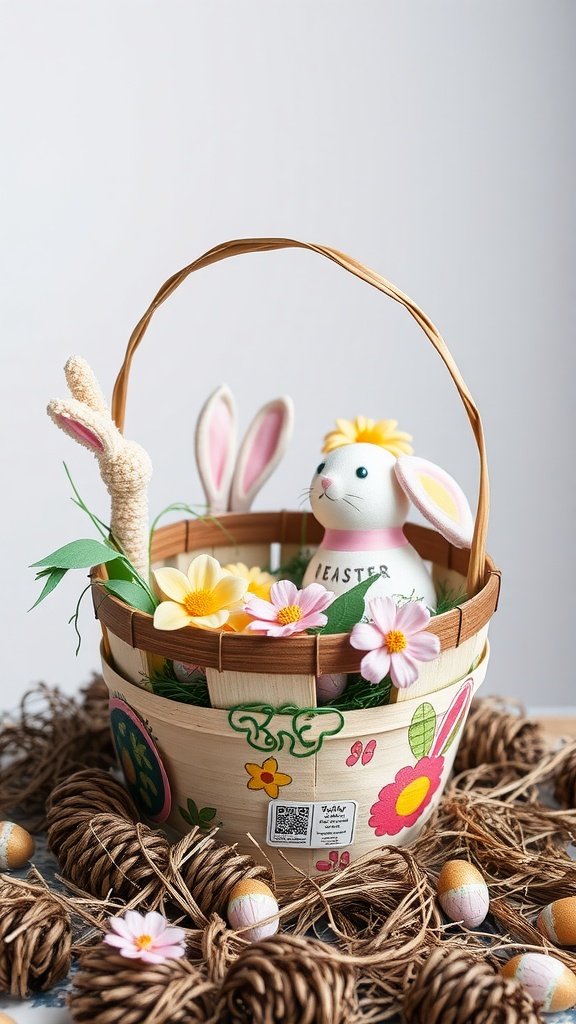
Creating an Easter basket from recycled materials is a fun and eco-friendly project that kids and adults can enjoy together. This DIY craft not only reduces waste but also adds a personal touch to your holiday celebrations.
The image shows a charming basket filled with colorful decorations. It features cute bunny figures and bright flowers, making it visually appealing. You can use materials like old baskets or even cardboard to create your own version.
To get started, gather your recycled materials. You will need a base like an old basket, some faux flowers, and decorative elements such as ribbons or stickers. Additionally, small toys or chocolates can be added for a surprise element.
Begin by cleaning your base thoroughly. Next, arrange the faux flowers and decorations inside the basket. Use glue to secure them, making sure to create a balanced look. Finally, fill the basket with treats or small gifts to complete your Easter surprise.
This DIY project is not just about crafting; it’s also about creativity and spending time with loved ones. Each basket can become a unique piece that reflects your style and personality.
Chick and Bunny Puppets
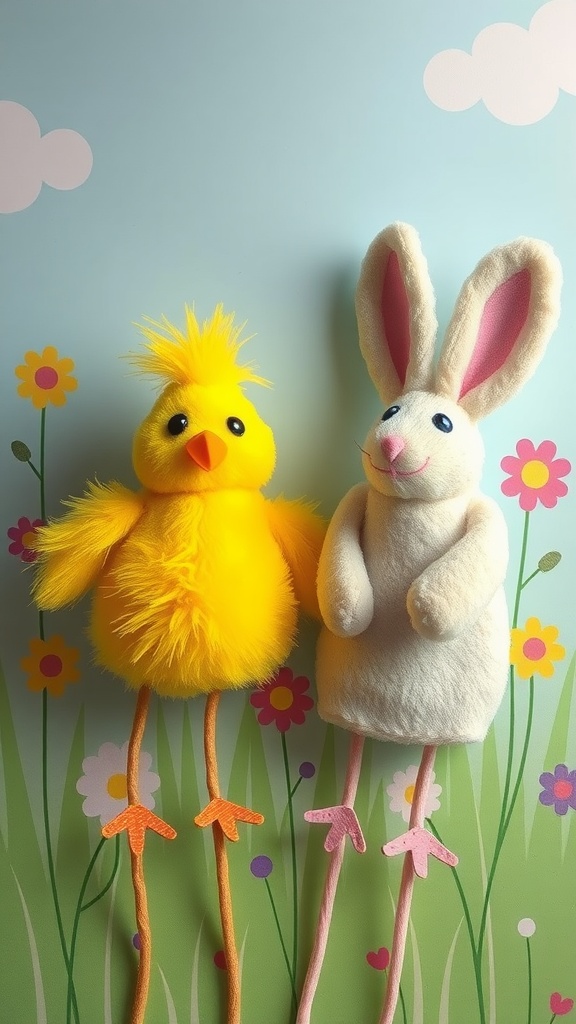
Chick and bunny puppets are a delightful craft that adds a playful touch to your Easter festivities. These simple creations can be made using materials you can find at your local dollar store, making them an affordable option for families looking to engage in DIY projects.
The yellow chick, with its fluffy texture and bright orange legs, is sure to bring a smile to anyone’s face. Its cheerful appearance is perfect for storytime or puppet shows. Next to it, the soft, white bunny puppet, with its adorable pink ears, is just as charming. Together, they create a fun duo, ready to entertain and inspire creativity.
To make these puppets, gather some basic supplies: felt, googly eyes, and pipe cleaners. You can easily find these at a dollar store. Start by cutting out the shapes for the chick and bunny bodies, then glue or sew them together. Add features like eyes and legs to bring them to life. Once finished, these puppets can be used for fun activities, like putting on a puppet show for friends and family.
Not only are they fun to make, but they also encourage imagination and storytelling among kids. Creating these chick and bunny puppets is a wonderful way to celebrate Easter while spending quality time together. So gather the supplies and get crafting!
Eggshell Planters
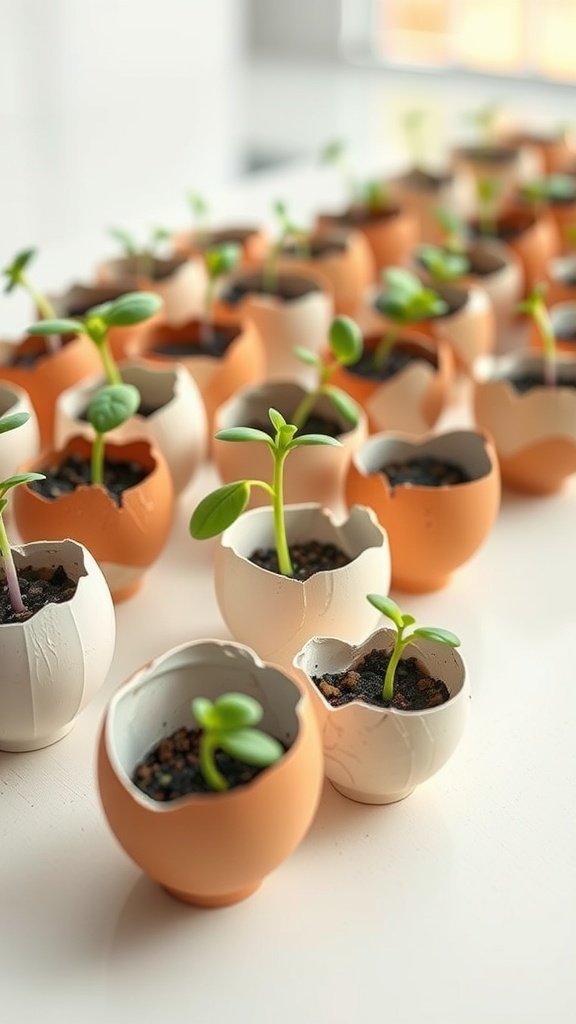
Eggshell planters are a delightful and eco-friendly way to celebrate Easter while adding a touch of greenery to your home. These charming little pots are made from real eggshells, often dyed in pastel colors, and can hold a variety of small plants or herbs.
To create your own eggshell planters, start by carefully cracking the shells of a few eggs, making sure to leave enough of the shell intact to hold the soil. Rinse out the insides and let them dry. Then, fill each shell with potting soil, and plant seeds or small sprouts. Herbs like basil or tiny succulents work particularly well.
Once your mini gardens are planted, arrange them in a sunny spot or on a festive table. They make lovely decorations for your Easter brunch or a fun project to do with kids. Plus, using items from the dollar store makes this craft budget-friendly and accessible for everyone!
Easter Egg Hunt Signs
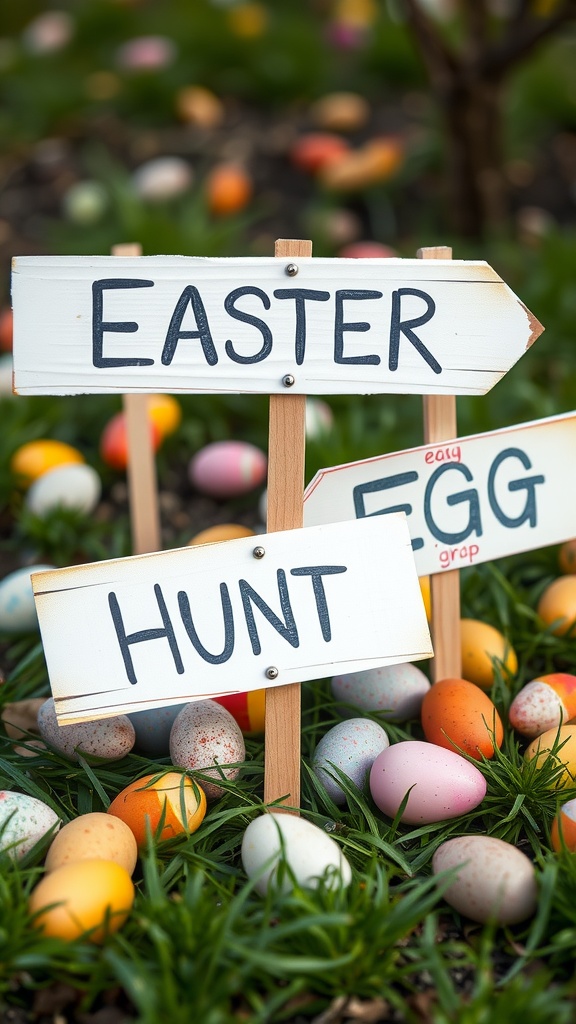
Easter egg hunts are a fun and cherished tradition for many families. To make your hunt even more exciting, consider adding some cheerful signs. These signs can help direct little ones to the treasures hidden around your yard.
The image captures a set of handmade signs that say “EASTER” and “HUNT.” They are simple yet effective, guiding everyone to the festivities. The signs are placed amid colorful, decorated eggs, creating a vibrant scene. This setup not only adds to the excitement but also enhances the overall aesthetic of your egg hunt.
You don’t need fancy materials to create these signs. Just grab some wooden stakes and some white paint. After painting the signs, you can use a black marker to write clear, bold letters. This DIY project is an easy task that can be done with kids, making it a fun activity before the big day.
Decorative Egg Jars
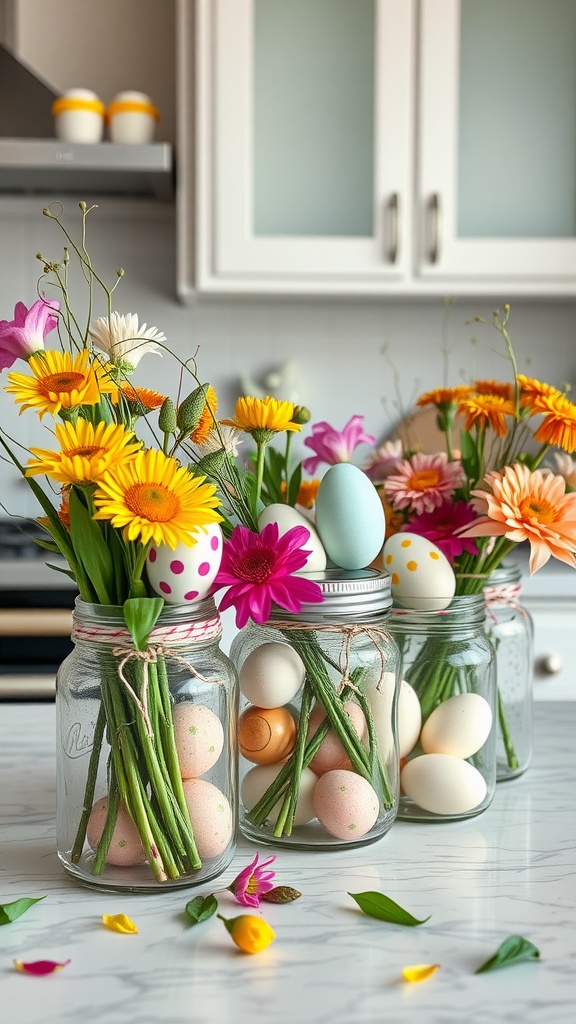
Decorative egg jars are a fun and vibrant way to celebrate Easter while adding a touch of charm to your home decor. These cute arrangements combine colorful eggs with fresh flowers to create cheerful centerpieces that are sure to brighten up any space.
To make your own decorative egg jars, start by gathering some clear jars. You can find these at your local dollar store. Next, fill the jars with an assortment of artificial or real flowers. Use bright colors like yellow, pink, and purple to bring your jars to life.
Once your flowers are arranged, add your eggs. You can use plastic eggs painted in fun designs or natural eggs that you’ve decorated. Mixing different colors and patterns will make your jars even more eye-catching. Tie a piece of twine around the top of each jar for a rustic touch.
Place these decorative egg jars on your dining table, mantel, or any surface that needs a little Easter spirit. They’re an easy and budget-friendly way to bring the holiday cheer into your home!
Bunny-Shaped Candles
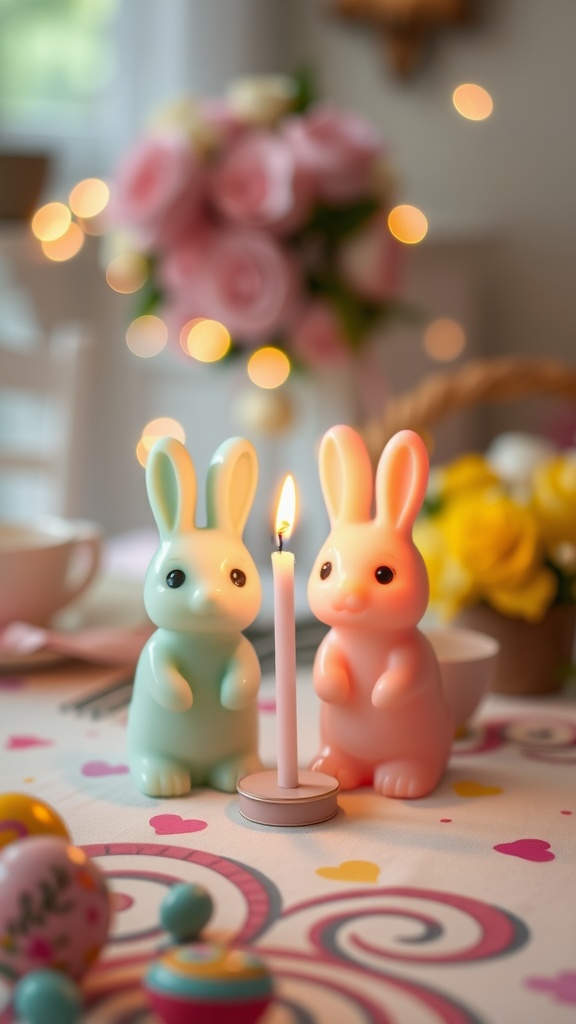
Bunny-shaped candles are a delightful addition to any Easter celebration. Their cute shapes and soft colors instantly bring a cheerful vibe to your decor. You can find these candles at your local dollar store, making them an affordable option for festive decorating.
In the image, we see two adorable bunny candles in pastel colors, sitting beside a lit candle. The warm glow adds a cozy touch to the scene, making it perfect for a spring gathering. Surrounding them, there are colorful Easter eggs and a beautiful bouquet of flowers, further enhancing the festive atmosphere.
Creating your own bunny candles can be a fun DIY project. All you need are some candle molds in bunny shapes, wax, and wicks. Melt the wax according to the package instructions, pour it into the molds, add the wicks, and let them cool. Once set, you can place them on your table for a charming Easter centerpiece.
Egg Carton Critters
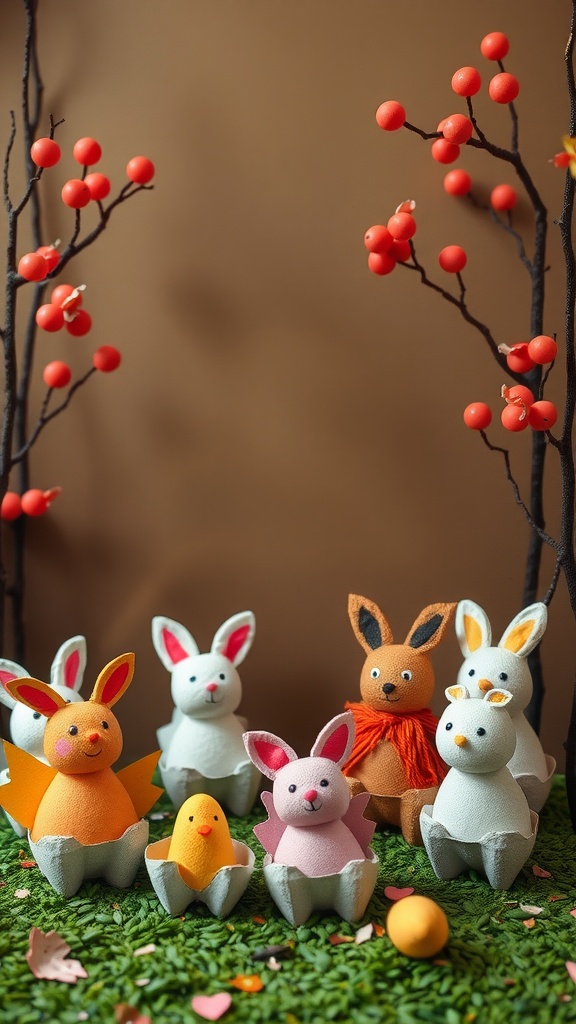
Egg carton critters are a fun and playful way to celebrate Easter, using materials that are often found around the house. In the image, you can see a delightful array of colorful characters crafted from egg cartons. These little creatures include bunnies, chicks, and even a cute little fox, showcasing just how versatile egg cartons can be.
To create your own egg carton critters, you’ll need a few simple supplies: an empty egg carton, scissors, paint, and some craft items like googly eyes and yarn. Start by cutting the egg carton into individual cups. Each cup can serve as a body for your critter. Then, unleash your creativity! Paint them in vibrant colors and add features like bunny ears or wings.
It’s easy to bring these critters to life. For example, you can make a bunny by adding long ears and a cotton ball tail. Add a bit of yarn for a scarf to give it personality. Once you’re done, place your critters on a grassy surface, like in the photo, for an adorable Easter display.
Paper Plate Easter Eggs
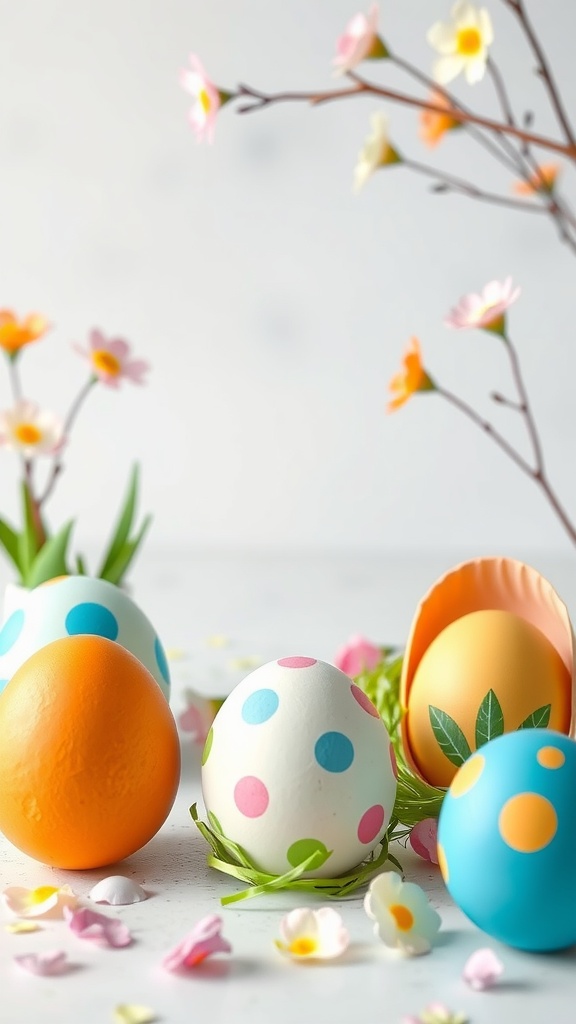
Creating paper plate Easter eggs is a simple and fun craft that anyone can enjoy. Using basic supplies, you can transform plain paper plates into colorful decorations. This craft is perfect for all ages, making it a great activity for families or groups.
To begin, gather your materials: paper plates, paint or markers, scissors, and some glue. You can also use stickers or washi tape for added flair. Start by cutting the paper plates into egg shapes. This is where kids can get creative, so let them design their eggs however they like!
Once you have your egg shapes, it’s time to paint or color them. Use bright hues to mimic the eggs in the image. Polka dots, stripes, or flowers can be charming designs. After the paint dries, you can add decorative elements like glitter or sequins for a little sparkle.
These paper plate Easter eggs are not just for decoration. They can also be used as place cards for your Easter dinner or as part of an Easter egg hunt. Kids will love searching for these colorful creations!
With just a few materials and a bit of creativity, paper plate Easter eggs can bring a festive spirit to your Easter celebrations. So, gather your supplies and start crafting!
DIY Easter Cards
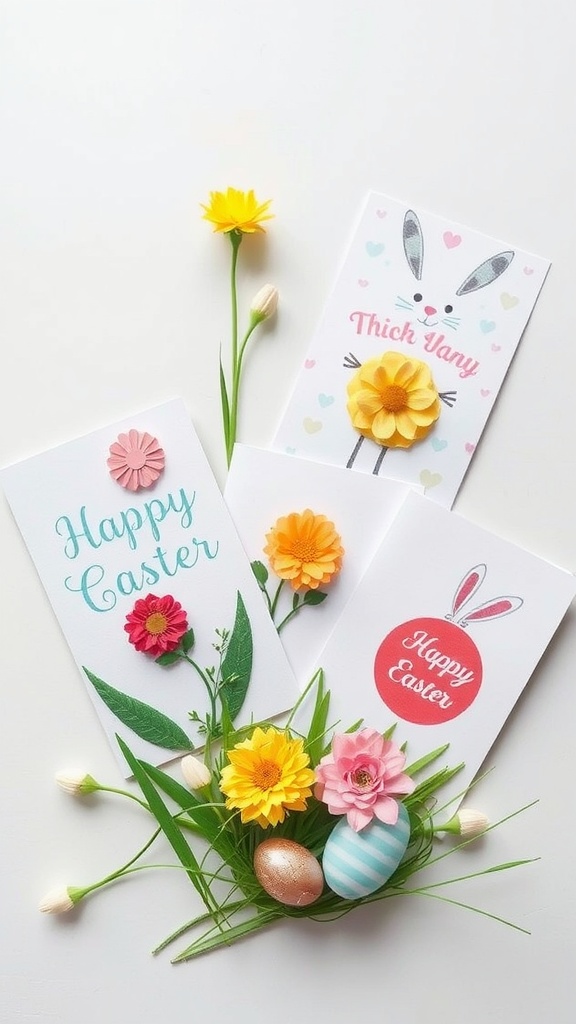
Making DIY Easter cards is a fun and personal way to share the holiday spirit. You can easily create unique cards using materials you might already have at home or find at your local dollar store.
In the image, we see a delightful arrangement of handmade cards. Each card features cheerful designs and bright colors, perfect for sending warm wishes to friends and family. The use of flowers and playful elements like bunny ears adds a festive touch.
To create your own cards, gather some cardstock, decorative paper, and embellishments like stickers or cut-out shapes. Don’t forget to add a personal message inside to make it special!
Overall, crafting these Easter cards not only spreads joy but also allows you to express your creativity. So, grab your supplies and start getting crafty!
Foam Egg Decor
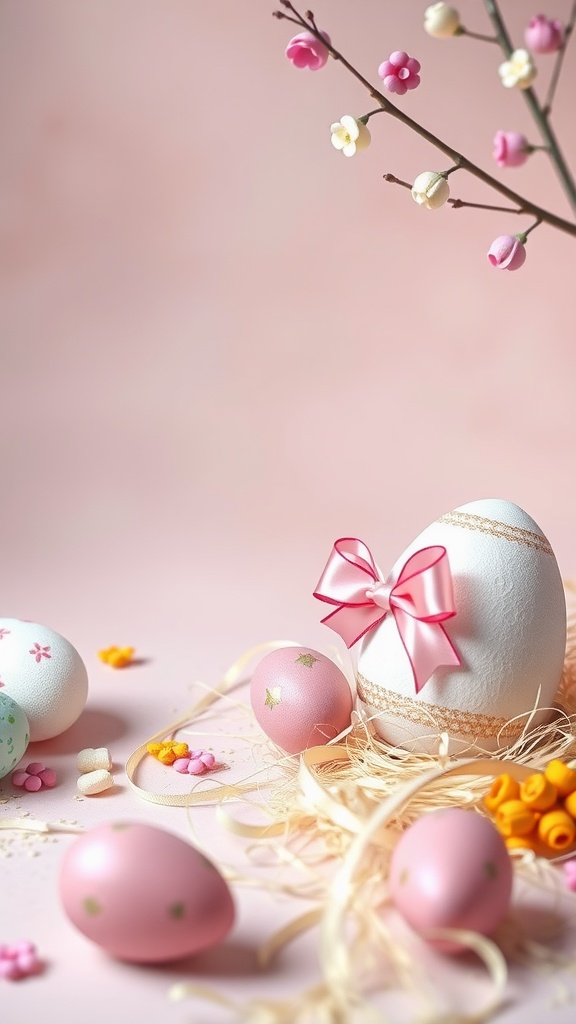
Foam egg decor is a fun and easy way to bring some holiday cheer into your home. These eggs are perfect for crafting and can be transformed into beautiful decorations for Easter. You can find foam eggs at most dollar stores, making this project budget-friendly.
The image shows a lovely arrangement of foam eggs in various colors, like soft pink and light blue. Some eggs are decorated with simple designs, while one stands out with a cute pink bow and ribbon. These details add a charming touch to your Easter decor.
To create your own foam egg decorations, gather some basic supplies such as acrylic paint, brushes, and embellishments like glitter, stickers, or ribbons. Start by painting the foam eggs in your desired colors. Once the paint dries, let your creativity flow by adding fun designs and decorations. The options are endless!
After decorating, place your eggs in a basket or display them on a table. You can even use them as part of a centerpiece. Adding some paper straw or flowers around them can enhance the look. This simple craft is a delightful way to celebrate Easter and can be done with family and friends, making it a memorable activity.
Homemade Flower Seed Bombs
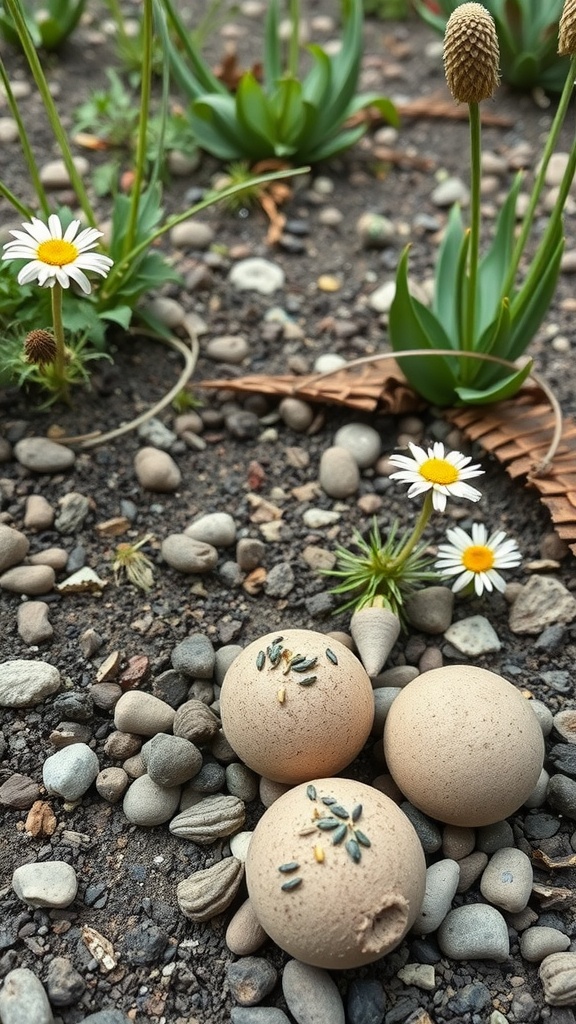
Spring is here, and what better way to celebrate than with homemade flower seed bombs? These little DIY projects are not only fun to make but also help bring some color to your garden. They’re small clay balls packed with seeds that you can toss into your yard or any bare patches of dirt.
The image shows a few of these seed bombs resting on the ground among small pebbles and vibrant daisies. The earthy, neutral tones of the seed bombs contrast beautifully with the lively greens and whites of the flowers around them. This simple scene captures the essence of nature’s rebirth during springtime.
Making seed bombs is easy and doesn’t require many materials. You’ll need flower seeds, clay powder, and compost or potting soil. Mix them together with a bit of water to form a dough-like consistency. Then, roll the mixture into small balls and let them dry. Once they’re ready, you can scatter them wherever you’d like to see blooms.
Try using a variety of seeds to attract different pollinators and create a vibrant display. It’s a delightful way to contribute to your local ecosystem while getting your hands dirty. Plus, it’s a perfect project to involve kids, letting them learn about gardening and nature in a fun way.
Easter Bunny Treat Bags
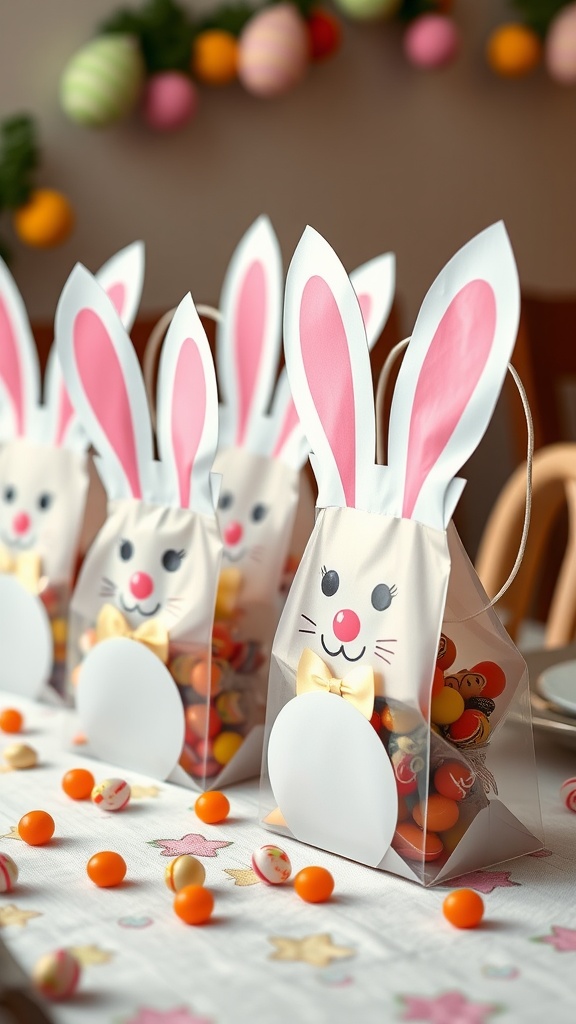
Easter Bunny treat bags are a delightful way to celebrate the holiday. These cute little bags are not only fun to make but also perfect for filling with sweet goodies. The image shows several treat bags designed to look like playful bunnies, each one with floppy ears and a cheerful face. These bags add a festive touch to any Easter gathering.
To create your own Easter Bunny treat bags, you’ll need some simple supplies from the dollar store. Start with clear plastic bags, which allow the treats inside to show through. Then, grab some pink and white craft paper to create the bunny ears and face. You can also find small candies and chocolates to fill the bags.
The steps are easy! First, cut out the bunny ears from the colored paper and attach them to the top of the bag. Use glue or tape to secure them. Next, draw or stick on a cute face. You can be as creative as you want! Finally, fill each bag with your favorite Easter treats and tie them closed with a ribbon.
These treat bags are not just for kids; they can be a fun activity for the whole family. Set up a crafting station and let everyone design their own unique bunny bags. It’s a great way to spend time together and get into the Easter spirit!
Felt Easter Egg Coasters
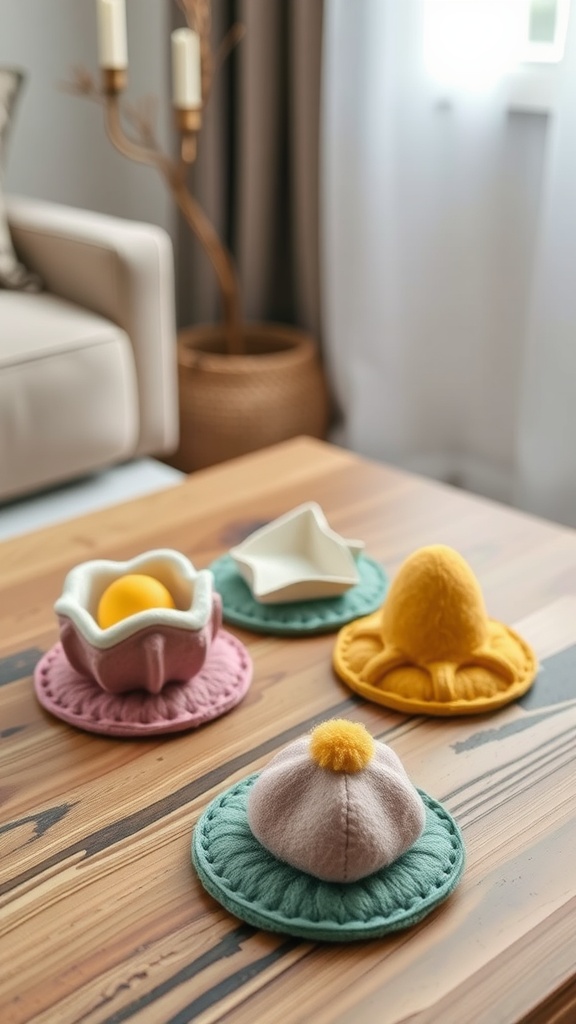
These Felt Easter Egg Coasters bring a playful touch to your home decor. Made from colorful felt, they feature shapes reminiscent of Easter eggs, adding a festive flair to any table setting. You can see a mix of pastel colors, including pink, yellow, and green, which are perfect for spring.
Creating these coasters can be a fun DIY project, ideal for all ages. You can easily find the materials at your local dollar store, making it a budget-friendly craft. Gather some sheets of felt in different colors, scissors, and a hot glue gun to get started.
The process involves cutting out egg shapes and layering them for a textured look. You can personalize your coasters with embellishments like pom-poms or additional felt figures. Once completed, these coasters not only protect your surfaces but also serve as charming decorations.
Place them on your coffee table to impress guests or use them during Easter gatherings to elevate your decor. They’re a simple yet delightful way to celebrate the season.
Pasta Noodle Eggs
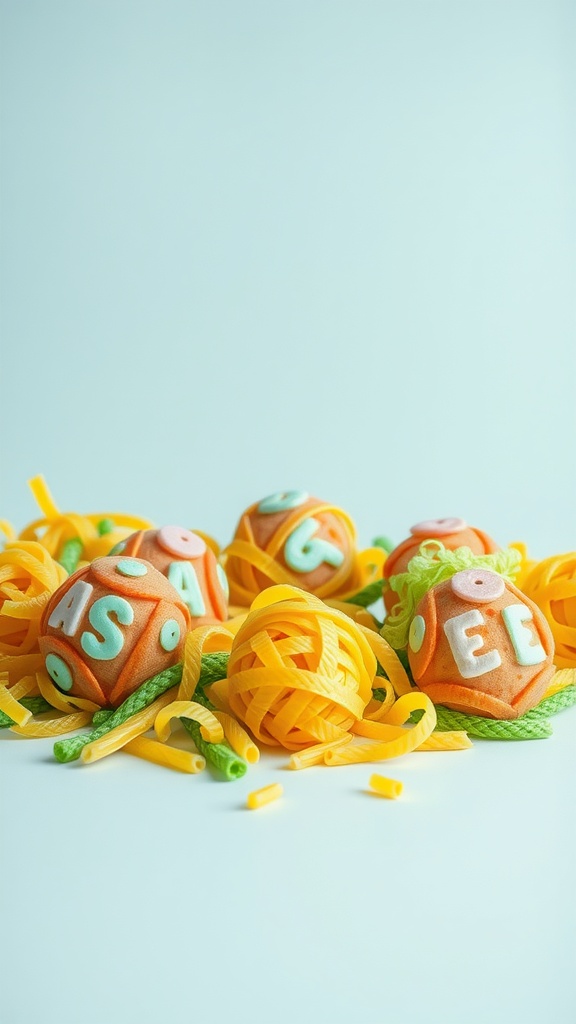
Pasta noodle eggs are a fun and creative way to celebrate Easter with a DIY twist. This craft combines the playful aspects of cooking and crafting, making it perfect for kids and adults alike.
In the image, you can see colorful pasta shaped into egg forms, surrounded by vibrant strands of noodles. The mix of colors makes it visually appealing and adds a cheerful touch to your Easter decorations.
To create your own pasta noodle eggs, you’ll need some essential supplies. Grab a variety of pasta shapes, such as macaroni or fettuccine, and some bright paints or markers. You can even use stickers to personalize each egg with fun letters or designs.
Start by painting or decorating your pasta shapes in different colors. Once they dry, you can arrange them into egg shapes and attach them with glue. The combination of textures and colors will surely brighten up your Easter festivities!
This activity is not only a great way to get crafty but also an opportunity to spend quality time with family. So gather your supplies and let your creativity flow as you make these delightful pasta noodle eggs!
Marbled Paper Eggs
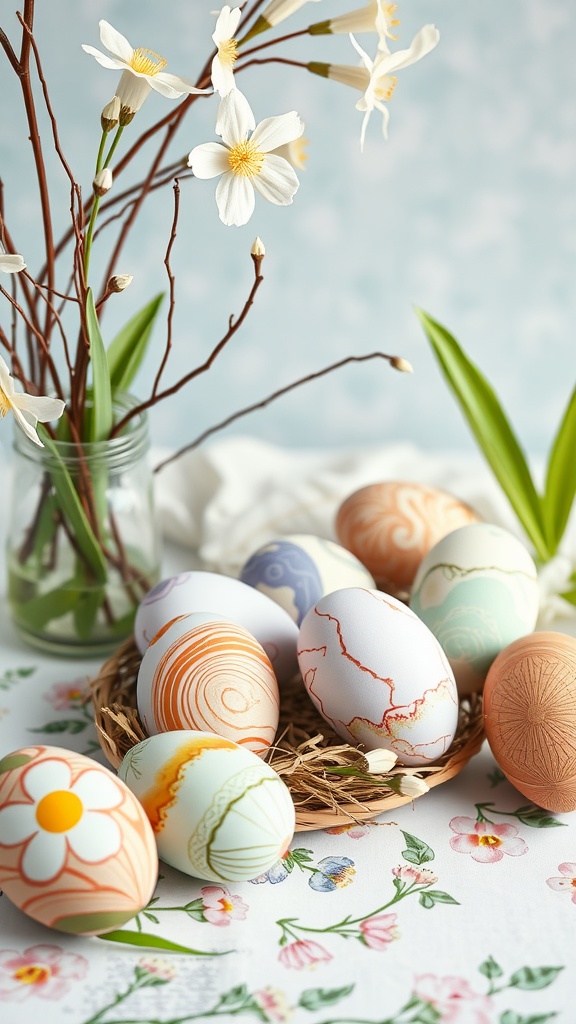
Marbled paper eggs bring a fun and creative twist to your Easter celebrations. These eggs are not just colorful; they showcase unique designs that make each one special. Using simple supplies, you can create beautiful decorations that add flair to your home.
To get started, gather some basic materials: white eggs (real or faux), food coloring, shaving cream, and a shallow dish. The process is easy and allows for a range of colors and patterns. First, fill the dish with shaving cream and drizzle food coloring on top. Then, use a toothpick or skewer to swirl the colors together.
Next, take your egg and roll it gently in the colorful mixture. The shaving cream will coat the egg and create a marbled effect. After a few seconds, wipe off the excess cream with a paper towel. Let the eggs dry, and you’ll be left with stunning decorations!
The eggs can be displayed in a basket or used as centerpieces. You can pair them with fresh flowers, as seen in the image, for an extra touch of spring. This craft is perfect for families, as everyone can get involved in making their very own marbled egg.
Bunny Tail Pom-poms
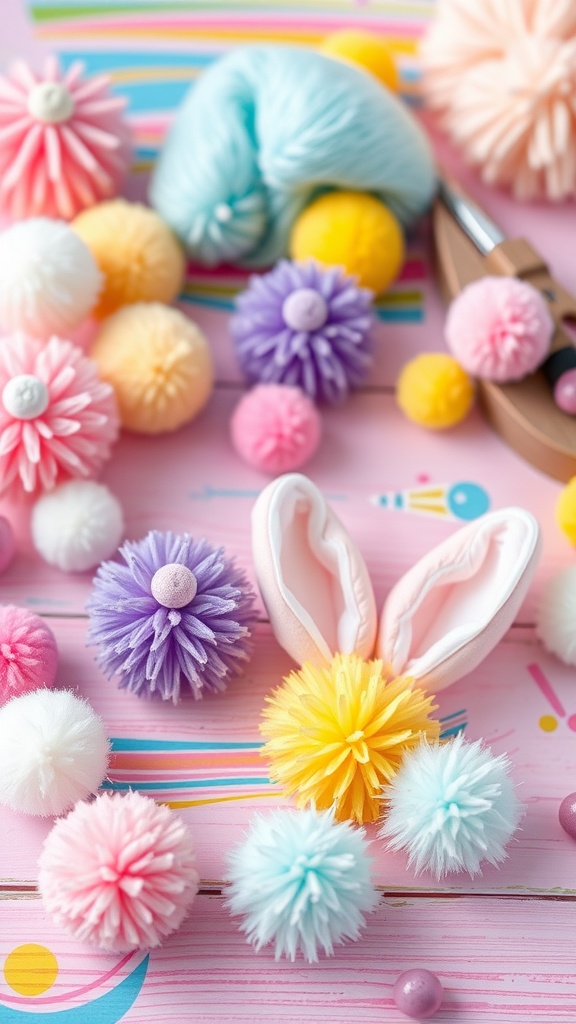
Bunny Tail Pom-poms are a playful and delightful craft to make for Easter. These fluffy decorations bring a fun, springtime vibe to your home. With just a few supplies, you can create your own adorable pom-pom bunnies that are sure to brighten up any space.
The image showcases a vibrant collection of pom-poms in various colors like pink, blue, yellow, and white. The soft textures and playful colors make these pom-poms stand out. You can use them for decorating Easter baskets, adding flair to your table, or simply just for fun!
To get started, you’ll need some yarn, scissors, and a pom-pom maker, which you can easily find at dollar stores. Wrap the yarn around the pom-pom maker to create the fluffy shapes, and then trim them to your desired look. Add little bunny ears, and you have yourself a cute bunny tail ready for the holiday.
This craft is not just for adults; kids can join in too! It’s a simple project that encourages creativity and fine motor skills. So, gather your supplies and let the pom-pom fun begin!
Origami Cranes for Easter
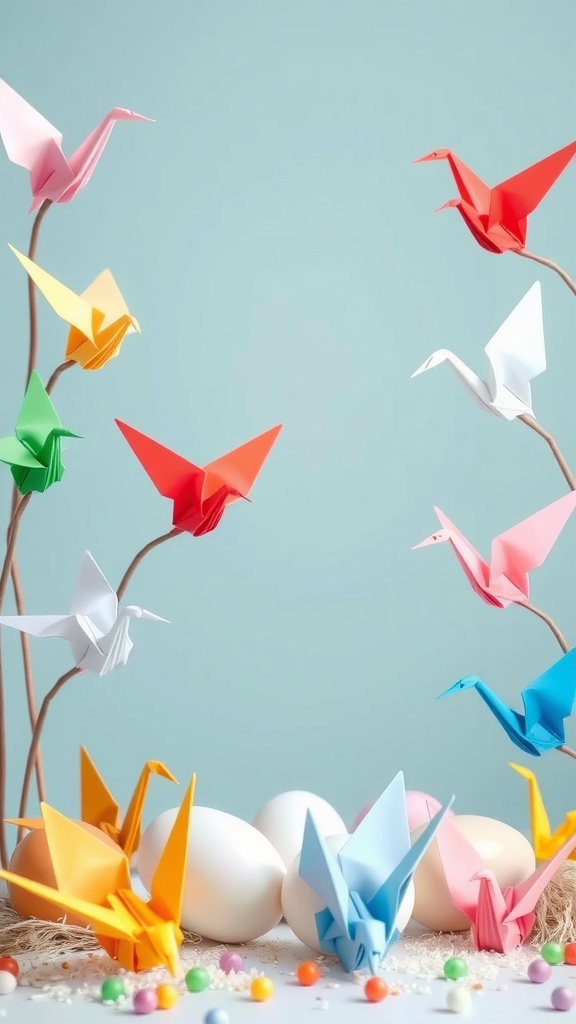
Origami cranes are a charming addition to any Easter celebration. These colorful paper birds can brighten up your decor and add a personal touch to your festivities. In the image, you can see an array of cranes perched on branches, surrounded by white eggs and pastel-colored candies. The vibrant colors of the cranes—red, yellow, blue, and pink—stand out beautifully against the soft background.
Creating these cranes is a simple and enjoyable craft that can be done with friends and family. All you need is some colorful paper and a little patience. Start by cutting your paper into square shapes, then follow easy online tutorials to fold them into cranes. It’s a fun way to keep the kids engaged while also celebrating the spirit of the season.
Once your cranes are finished, you can use them as part of a centerpiece or hang them as festive decorations around your home. They add a whimsical flair that fits perfectly with the Easter theme. Plus, making origami cranes can be a mindful activity, allowing everyone to slow down and enjoy the process of creating something beautiful together.
Jelly Bean Flower Pots
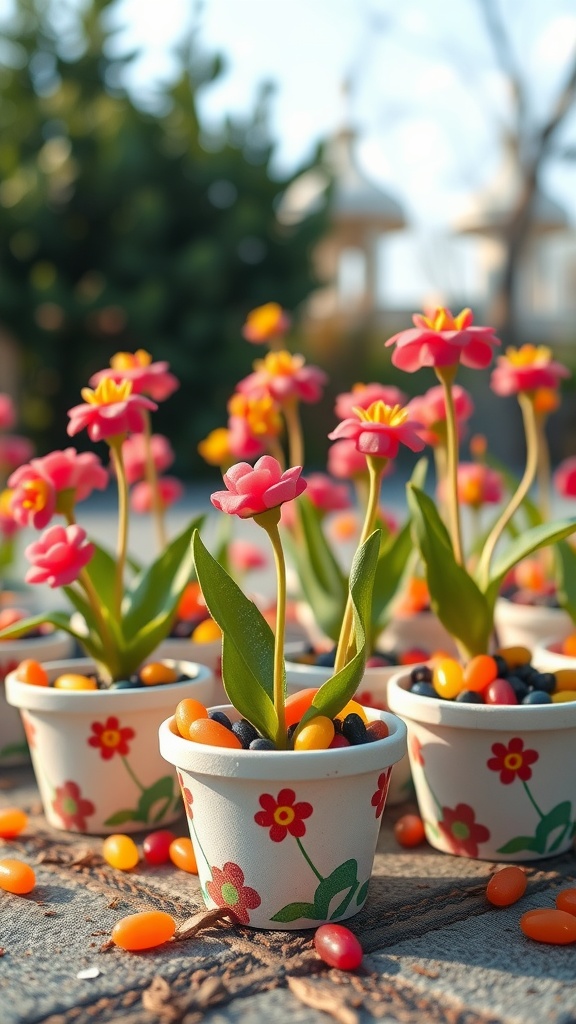
Jelly Bean Flower Pots are a charming way to celebrate Easter while adding a splash of color to your home. These delightful crafts combine the sweetness of jelly beans with the beauty of flowers, creating an eye-catching centerpiece or decoration.
To create these fun pots, all you need are some small flower pots, faux flowers, and a generous handful of jelly beans. You can find everything you need at your local dollar store, making it an affordable option for your Easter festivities.
Start by filling the pots with jelly beans, using a mix of colors for that vibrant look. Next, insert the faux flowers into the jelly beans, which will hold them in place. The result is a playful arrangement that looks cheerful and inviting.
These Jelly Bean Flower Pots make a great activity for kids and adults alike. They can be used as table decorations, gifts, or even as part of an Easter egg hunt. Plus, when the holiday is over, you can enjoy the jelly beans as a sweet treat!
DIY Easter Story Stones
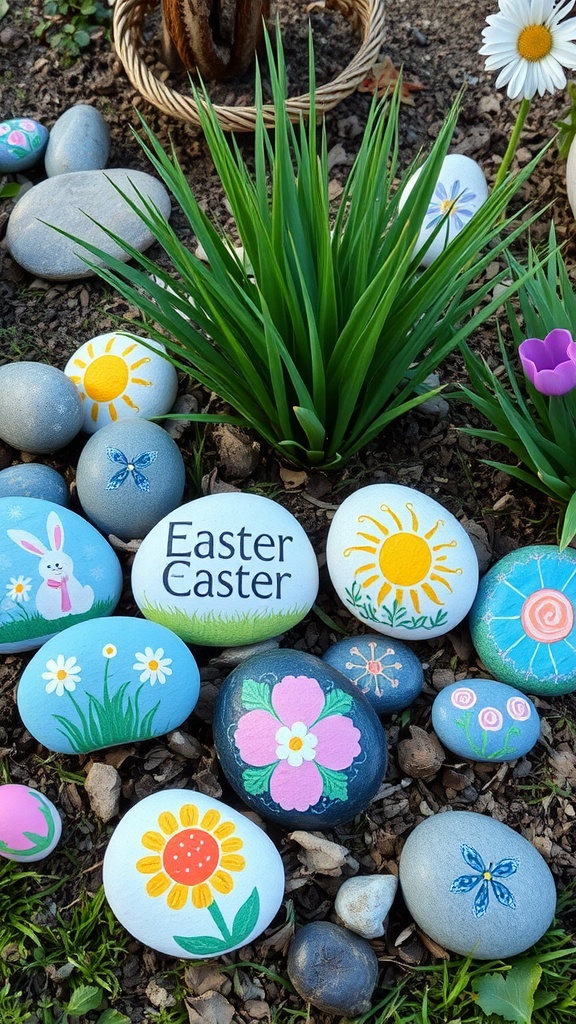
DIY Easter Story Stones are a fun and creative way to celebrate the holiday while engaging in storytelling. The image showcases a delightful collection of painted rocks, each adorned with cheerful designs that evoke the spirit of Easter. From bunnies to flowers and sunny skies, these stones bring a touch of whimsy to any outdoor space.
To create your own story stones, start by gathering smooth rocks from your yard or a local park. Using acrylic paints, let your imagination run wild. You can paint symbols, characters, or even words related to Easter. Once the paint has dried, these stones can be used to tell stories, create games, or simply add festive décor to your home.
Not only do these story stones look lovely, but they also encourage creativity and imaginative play. Kids and adults alike can have fun making up stories based on the designs. This makes it a perfect family activity during the Easter season. Plus, it’s a budget-friendly project that you can easily do with supplies from your local dollar store.